
Miss 6 had been planning her 7th birthday cake for months. Being a huge fan of the Disney Frozen movie, that was the theme she wanted with an Anna and Elsa on the top was her strict instructions! At the time I was hunting for anything in the “frozen” theme, there was nothing in the shops. Fortunately ebay was my life saver and I bought the whole set of cake topper characters for under $20.
Pinterest was also my inspiration for the snow flakes. I had originally decided to pipe them with nestle while melts, but for some strange reason I could not get them to successfully melt enough to pipe. I tried melting them in the microwave twice and once over boiling water. No success! I had always wanted to try royal icing, but it was too late to source some meringue powder or try to work out whether making it with egg whites and citric acid substitute would work to replace the lemon. In my desperation (birthday the next day and it’s now 5pm) I sent my husband to the supermarket on his way home from work. He found the queens brand royal icing packet. Ingredients looked ok, just add water… it will have to do!
I was surprised at how easy the royal icing was to work with. I am not the greatest at piping to begin with, I was worried I was going to have a pinterest fail… but not every snow flake is the the same right? So that is my story and I am sticking to it, lol!
To make the snowflakes, I used this cute little basic snowflake template (follow the link). I measured the height of the cake and the width of the patty cake pans to roughly work out what diameter sized snowflakes I needed for each. Then printed them out to size. The A4 paper with the templates on goes underneath some baking paper so you can see the image through it. Pipe onto the baking paper, re-position the template underneath and pipe again. Place a Hopper Pearls in the centre of each snowflake. I used silver ones and the blue from the rainbow packet. (** see notes below)The royal icing packet says to allow to dry over night to set. I was worried how well it would actually set and if I would be able to gently lift them from the baking paper. Huge sighs of relief in the morning when it had worked perfectly, just handle delicately so they won’t break! Happy mummy and ecstatic birthday girl!

The cake is a marble cake recipe from the Thermomix My Way of Cooking cook book. I used carob instead of cocoa. As most of my cakes do, it rose up in the centre of the cake, once levelled off, the top piece was perfect to use for the two snow mounds in the front on the cake board. I always find it easier to make the cake a week before and keep in the freezer until I am ready to ice it. This also reduces the amount of cake crumbs that stick to the icing when spreading it over. I have a beautiful mosaic mirror that I thought was perfect to sit the cake onto.
The blue on the cake is a dairy free butter cream icing with blue hopper colour added to it (** see notes below). A little under the cake and the mounds to stop them sliding off the board, then cover with the icing. Place cake in the fridge while preparing the fondant.
Marshmallow Fondant. Here is the link to my marshmallow fondant. I always like to make it the day before. It is much easier to work with after resting for a few hours or over night. Take a quarter of the fondant and roll out a little larger than the size of the cake tin. I used a knife and cut in waves all the way around. Roll fondant back over the rolling pin and lift draped over the rolling pin and place gently over the cake allowing it to come down the sides of the cake and smooth down with your hands. Do the same with the snow mounds. Another way to easily get the fondant onto your cake is to roll it on baking paper and lift up the baking paper with the fondant on it and flip gently over on top of the cake then peel the paper away.
Gently place a snowflakes on the blue icing all around the cake using a little of the blue icing in the middle of the back of each to enable them to stick in place. Add your figurines and you are good to go!
Frozen Cup Cakes.
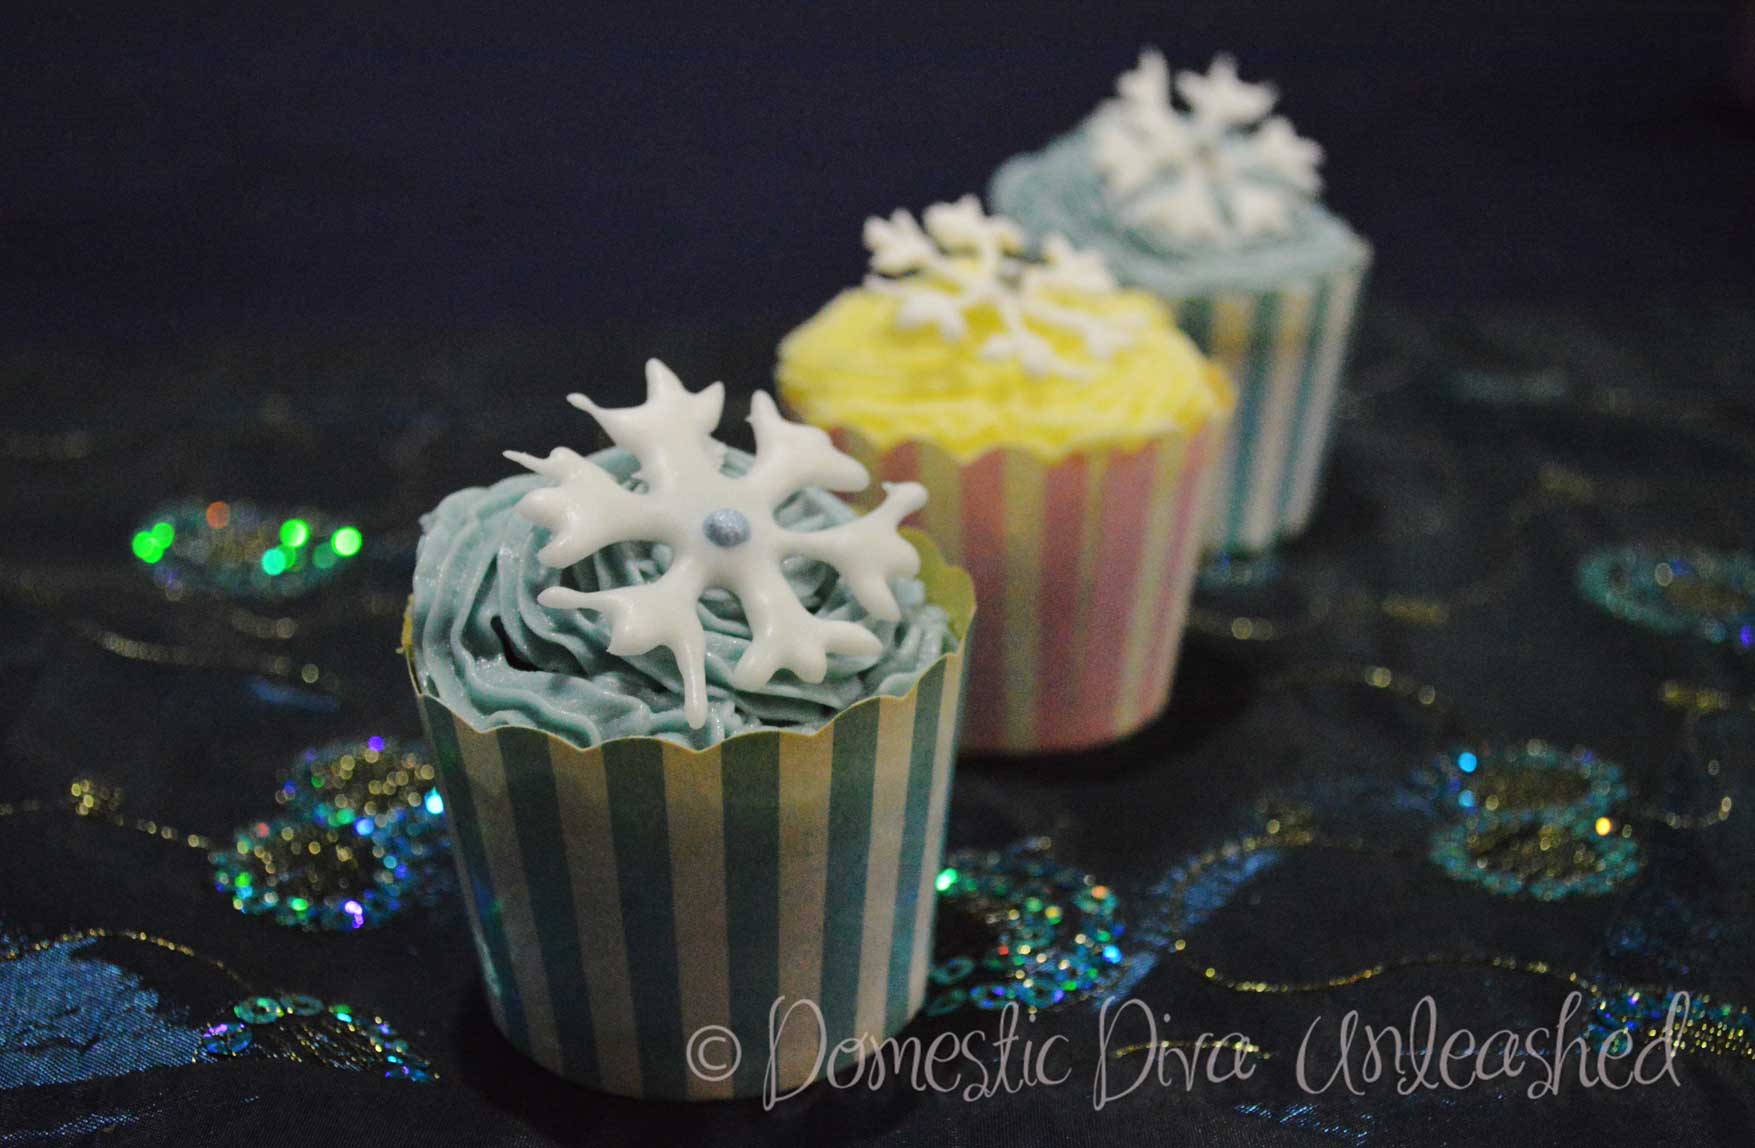
Above is a pic of the cup cakes my daughter took to school to share with her class mates. My rustic snowflakes hide a multitude of sins. Please don’t look too closely at my piping efforts, lol… one day I will get to a class to learn how to pipe beautifully! For the cup cakes I made a double batch of the too easy chocolate cake in the Thermomix Everyday Cookbook substituting the cocoa for brown sugar to make them into yummy caramel cakes. The icing is the same recipe as linked above. I used some of the left over blue from the cake and kept some plain.
Notes: ** I love Hopper Colours and sprinkles as they use natural colours or fruit and vegetables as their colouring, nothing nasty! Some are completely suitable for the Failsafe elimination diet, others will contain Salicylates as they are coloured by fruit and vegetables.

Well done, that looks amazing. I bet your daughter was thrilled. And yet no one else would have known the trouble you went to to make it safe! Just popping in to find a recipe for dinner tonight and was glad to see a brand new post. Thanks for sharing your recipes and cakes.
Thanks Fiona. 🙂
Hi, looks fabulous! How do you store the fondant, in the fridge? And what type of container do you put it in?
I’m making this tomorrow!
Hi Vikki, I store the fondant wrapped in freezer bags (one for each colour) and place it in a small bowl in the fridge.
Huge apologies for my late reply, I have just discovered a heap of comments that somehow made it to my spam folder 🙁